|


| |
| Online
Help Manual - Part Three |
|
- FTP
- Uploading Your Files to the Server
- For
PC Users - CuteFTP
For
PC Users - WS-FTP
- For
Macintosh Users - Fetch
The process by which
files are transferred to the web server is called "FTP"
(File Transfer Protocol). You have unlimited access via FTP 24 hours
a day. As such, you can create and maintain your web pages on your
own computer and upload files to your website on our servers at your
leisure.
Online services which
offer an Internet gateway, such as AOL, CompuServe, and Prodigy may
have a built-in FTP interface. If you have a PPP Internet account,
you need an FTP program.
IMPORTANT:
If you are using FrontPage, you should NEVER use regular FTP to
upload your files. This will damage the server's FrontPage
extensions. Stick with one or the other all the time. Please refer
to the instructions in the FrontPage section for uploading files.
For instructions on the
most popular FTP client software for both PC and Macintosh users,
see the instructions to follow.
- Back
to the Top of this Page
-
- Back
to the Table of Contents
Here is a very helpful
support link for CuteFTP:
http://cuteftp.com/support/generalusage/generalusage.html
The following information
is contained within your account activation notice and is needed to
connect you to your website via FTP:
User
ID (username or login, they're both the same)
Password (your
password)
Host Address (your
domain name or IP address)
Each time you run CuteFTP
the Session Profile window will be displayed. A profile contains the
information needed to connect to your website. Creating a profile
now will eliminate the need for you to configure the software each
time you want to connect to the web server via FTP. To create a
profile, click the "Add site" button and enter a
generic "Site Label" at the top of the "Add
Host" window, such as "My Website". Next, enter your
Host Address (yourdomain.com or IP address), User ID (username or
login), and Password for your website as illustrated in Figure
1A.
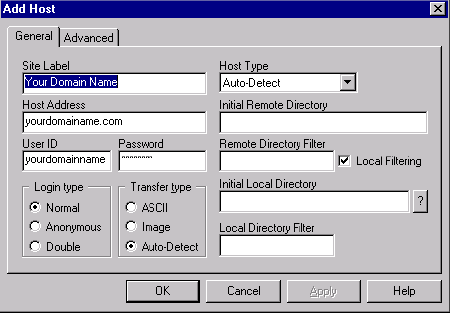
Figure 1A
Next, you
need to click "OK" to continue. This will connect you to
the webserver, where you will connect directly to the root
("home") directory of your account. CuteFTP will display a
split screen where files on the left-hand side are within your own
computer on your hardrive. You will see several folders on the
right-hand side such as www and infobots which are landmarks
suggesting a successful connection to your website, as illustrated
in Figure 1B.
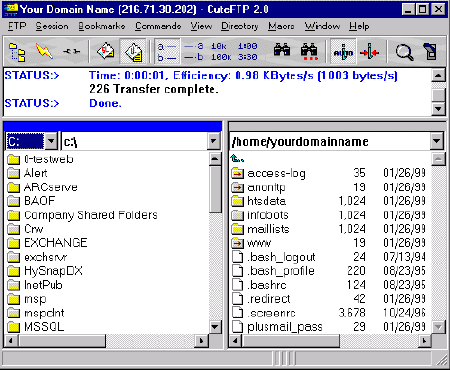
Figure 1B
You need to double click
on www to get to your web directory. This is where all your files
will be downloaded, and/or you will create subdirectories. The only
system directory that you may need to use is cgi-bin; this directory
is reserved for custom scripts. To make your home page load
automatically, name the HTML document "default.htm" in
lowercase and upload it to the www directory of your account. To
upload a file or files, simply highlight the file(s) on the left and
drag them over to the right-hand window. Be sure to upload HTML
documents and scripts in ASCII mode and images in Binary mode. To
transfer a file to a subdirectory, double-click the appropriate
subdirectory to open it before transferring the desired file(s). To
create a new directory, right-click over the right-hand pane and
select "Make new dir" button when you are inside the www
directory or a subdirectory.
As soon as a file is
uploaded to the web server, it is available for all to see. If,
after uploading a file, you are still unable to see the updated file
via Netscape, try hitting the "Refresh" or
"Reload" button on the browser. If that fails, you need to
clear both disk and browser cache. This function can be found by
selecting "Options" then "Network Preferences"
in Netscape. Remember that you must first be connected to the
Internet through your local Internet service provider in order to
connect to the web server.
- Back
to the Top of this Page
-
- Back
to the Table of Contents
The following information
is contained within your account activation notice and is needed to
connect you to your website via FTP:
User
ID (username or login, they're are both the same)
Password (your
password)
Host Name (your domain
name or IP address)
Each time you run WS_FTP
the Session Profile window will be displayed. A profile contains the
information needed to connect to your website. Creating a profile
now will eliminate the need for you to configure the software each
time you want to connect to the web server via FTP. To create a
profile, click the "New" button and enter a generic
profile name at the top of the Session Profile window, such as
"My Website." Next, enter your Host Name/Address (yourdomain.com),
User ID (yourdomain), and Password for your website as illustrated
in Figure 2A.
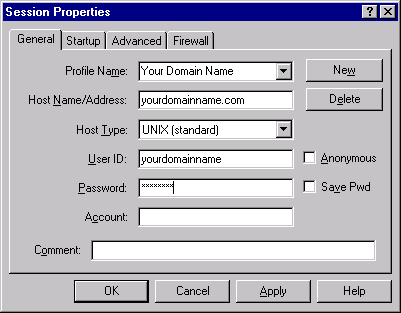
Figure 2A
Next, you need to click
"OK" to continue. This will connect you to the webserver,
where you will connect directly to the root ("home")
directory of your account. WS_FTP will display a split screen where
files on the left-hand side are within your own computer. You will
see several folders on the right-hand side such as www and infobots
which are landmarks suggesting a successful connection to your
website, as illustrated in
Figure 2B.
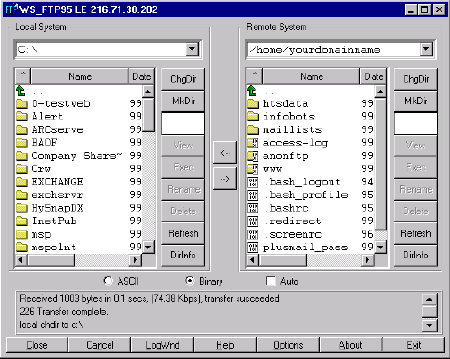
Figure 2B
You need to double click
on www to get to your web directory. This is where all your files
will be downloaded, and/or you will create subdirectories. The only
system directory that you might need to use is cgi-bin; this
directory is reserved for custom scripts. To make your home page
load automatically, name the HTML document "default.htm"
in lowercase and upload it to the www directory of your account. To
upload a file or files, simply highlight the file(s) on the left and
click the right arrow button (->) in the center of the window. Be
sure to upload HTML documents and scripts in ASCII mode and images
in Binary mode. To transfer a file to a subdirectory, double-click
the appropriate subdirectory to open it before transferring the
desired file(s). To create a new directory, click on the MkDir
button when you are inside the www directory or subdirectory.
As soon as a file is
uploaded to the web server, it is available for all to see. If,
after uploading a file, you are still unable to see the updated file
via Netscape, try hitting the "Refresh" or
"Reload" button. If that fails, you need to clear both
disk and browser cache. This function can be found by selecting
"Options" then "Network Preferences" in
Netscape. Remember that you must first be connected to the Internet
through your local Internet service provider in order to connect to
the web server.
- Back
to the Top of this Page
-
- Back
to the Table of Contents
The following information
is contained within your account activation notice and is needed to
connect to your website via FTP:
USER
ID (username or login, they are both the same)
PASSWORD (your
password)
FTP HOSTNAME (your
domain name or IP address)
The hostname tells your
FTP software to connect to the web server upon which your website
resides.
Each time you run Fetch,
the New Connection... window will be displayed. A profile contains
the information needed to connect to your website. Creating a
profile now will eliminate the need for you to configure the
software each time you want to connect to the web server via FTP. To
create a new profile, select "New Connection..." from the
File menu. Next, enter the Host (yourdomain.com), User ID (yourdomain),
and password for your website as illustrated in Figure
3A.
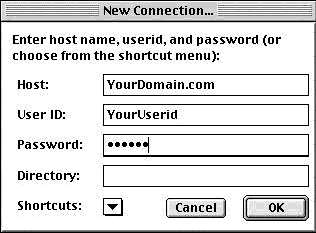
Figure 3A
Don't worry about the
Directory option right now. When you have your Host, User ID, and
Password entered, click on the OK button.
The next window which
will pop up will look virtually the same as Figure
3B, except that yourdomain will be in the popup window.
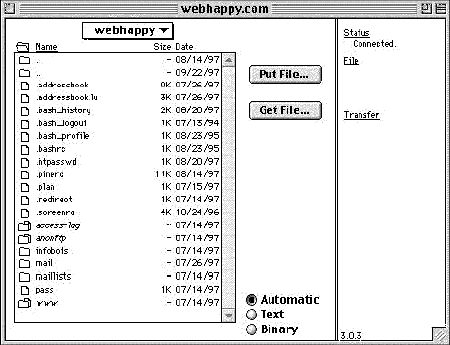
Figure 3B
Bookmarking
the Connection:
You should take the time, now that you have established your
connection, to make it easier for you to get here next time. Under
the Customize menu, select New Shortcut. A window will pop up called
Bookmark Editor, as shown in Figure 3C.
It will already have your name, Host, and User ID filled in. Under
Type, choose File from the popup menu. If you would like Fetch to
remember your password so you won't have to type it in each time,
type in your password in the Password field. Now, under the same
Customize menu, choose Preferences, and under the General tab, make
sure the connection you just entered is selected as the default
shortcut. Next time you open up Fetch, your shortcut will be opened
automatically and all you'll have to do is click the OK button!
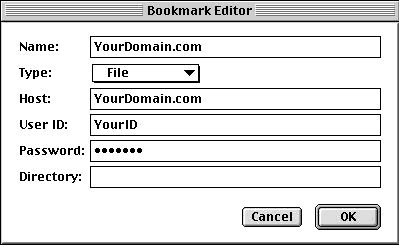
Figure 3C
How
to Transfer Files:
Refer again to Figure 3B. You
need to double-click on www to get to your web directory. This is
where all your files will be downloaded, and/or you will create
subdirectories. The only system directory that you might need to use
is cgi-bin; this directory is reserved for custom scripts. To make
your home page load automatically, name the HTML document "index.htm"
in lowercase and upload it to the www directory of your account. To
upload a file or files, simply drag them from your hard drive onto
the Fetch window when you are in the appropriate directory or
subdirectory. Be sure to upload HTML documents and scripts in Text
mode and images in BINARY mode. Or to make it easier, click on the
Automatic button as shown in Figure 3B,
and Fetch will decide the proper format. To transfer a file to a
subdirectory, double-click the appropriate subdirectory to open it
before transferring the desired file(s).
To insure that the
Automatic selection works properly, make sure the selections under
the Upload tab in the Preferences window looks the same as Figure
3D below:
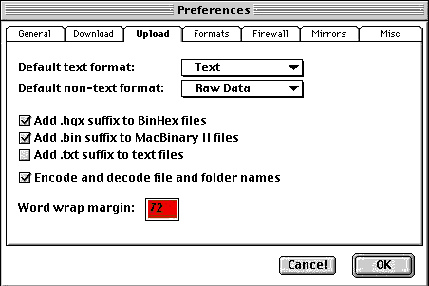
Figure 3D
As soon as a file is
uploaded to the web server, it is available for all to see. If,
after uploading a file, you are still unable to see the updated file
via Netscape, you need to hit the Reload button in the Netscape
button bar. Remember that you must first be connected to the
Internet through your local Internet service provider in order to
connect to the web server.
- Back
to the Top of this Page
-
- Back
to the Table of Contents
|
|
